Showing posts with label Blogging. Show all posts

10 Plugins for wordpress that deal with Error 404 Pages

10 Plugins for wordpress that deal with Error 404 Pages - Screenshot
The plugins below can go a long way toward preventing your visitors from ever seeing a 404 page. These plugins are all free and range from plugins that automatically redirect your visitors to ones that simply log 404 errors.
Click on the linked headings to download the following plugins for WordPress:

  1. 404 Notifier
    This plugin from Alex King will help notify you of any 404 errors coming up on your site. It’s a very useful plugin to use if you’re changing your permalink structure or otherwise moving things around and are worried you may have missed some things and don’t want to risk broken URLs.
  2. Smart 404
    The Smart 404 plugin helps eliminate 404 pages automatically. If a visitor reaches a page that will return a 404 error, this plugin searches the requested URL to see if there’s some other post that likely matches. If there’s more than one potential match, it can return a list of possible links. It goes a long way to help remedy a high bounce rate caused by 404 errors.
  3. Google 404
    This widget makes it easy to embed a Google search box on your custom 404 page.
  4. Useful 404s
    A plugin that creates more useful 404 pages, including a number of things mentioned in the A List Apart article “A More Useful 404“.
  5. The Free 404 Plugin
    This plugin creates a customized 404 page that includes related posts to whatever keywords appear in the requested URL.
  6. JH 404 Logger
    This plugin adds a dashboard widget that displays recent 404 errors. It’s a great, unintrusive way to see if your site is returning errors.
  7. WP 404 Images Fix
    This plugin lets you replace images returning a 404 error with a default image of your choosing. You also have the option to add a class to the img tag or hide the image entirely if it’s missing.
  8. Dunstan-style Error Page
    This plugin can be used to create a custom error page similar to the one used on Dunstan Orchard’s 1976design.com/blog. The custom page it creates is immensely useful to users, displaying the last five blog posts, a search box, and the option to report the error, among other options.
  9. Permalinks Moved Permanently
    This plugin is helpful if you change the permalink structure of your blog and don’t want to lose out on incoming links going to your old pages. In addition to redirecting the visitor to the new link, it also generates a “301 Moved Permanently” error so that visitors are automatically redirected in the future (along with search engine spiders).
  10. Redirection
    This plugin monitors 404 errors and lets you map them to 301 redirects. It also allows you to set a custom redirection that lets you pass a URL through to a different page, file or website. And it creates a full log of all redirections. It can be used to redirect both nonexistent pages and ones that exist and it can be set to redirect based on login status or other parameters.

All about the Blogger 'Monetize' tab

The Monetize tab in Blogger makes it easy to enable AdSense ads on your blog. Once enabled, Blogger will retrieve your AdSense earnings data directly from AdSense so you do not need to go to AdSense to get basic earnings information.

AdSense Reports

Once you start generating AdSense impressions, you will begin earning money when people click on ads that show on your site.
The earnings report (visible when you click on the Monetize link from your Dashboard, or the Monetize tab when viewing your blog while logged into Blogger) includes a drop-down bar with Today, Yesterday, Last 7 Days, This Month, Last Month, and All time.
Selecting an option will retrieve the relevant report directly from AdSense.

All time

If you are already an AdSense user, you will notice that Blogger created a new channel (with the URL of your blog) in your account. If you have had AdSense ads on your blog before using Blogger’s AdSense integration to insert ads into your blog, it is important to note that All time will retrieve data only from the time you connected Blogger to your AdSense account.
This in no way affects your overall AdSense reporting, available directly from AdSense.

Terminology

The AdSense report visible from the Monetize tab contains basic information about how many ads have run on your blog, how many clicks were generated, and how much revenue you have earned. Each term in the report is defined below:

  • Page impression: A page impression is generated every time a user views a page displaying Google ads. We will count one page impression regardless of the number of ads displayed on that page. For example, if you have a page displaying three ad units and it is viewed twice, you will generate two page impressions and six ad unit impressions.

  • Clicks:# The number of times an ad was clicked on in the given reporting period.

  • Page CTR (Clickthrough Rate): The number of ad clicks divided by the number of impressions for the page of ads that appears when a link unit is clicked.

  • Page eCPM (Effective Cost Per Thousand Impressions): Calculated by dividing earnings by number of page impressions and multiplying. This makes it easier to compare multiple sites to see which are performing better.

  • Earnings: Total revenue earned to date. More detail about earnings is available in the AdSense Help Center.

  • How do I show ads between my posts?

    If you want to show ads between your posts but chose not to do it while initially signing up for AdSense, first go to your Template | Page Elements tab. Then, in the "Blog Posts" section, click on "Edit". A pop-up window will appear with options to configure your blog posts. Check the box next to "Show Ads Between Posts". (Note: You must be signed up for AdSense before you can check this box.)
    Show Ads Between Posts Once you check this box you'll see the configuration options for your ads. You can then select how often you would like ads to be shown after your posts.
    Show after every x posts For example, if you want ads to be displayed after every post, select "1" from the drop-down menu. (Please note that AdSense policies limits you to a total of 3 ad units per page and Blogger will automatically prevent you from going over this limit.) You can then select your ad format and colors. Once you have finished configuring your ads, click on the orange "Save Changes" button in the bottom right corner.

    About AdSense and Google Affiliate Network for Your Blog

    Easy AdSense for Your Blog

    Blogger provides a simple way for you to make money with your blog. AdSense is Google's content-targeted advertising program. This means that you don't select keywords or categories for your ads. Instead, Google's servers determine what your posts are about and display the most relevant ads to your readers. So, if you blog about baseball, there might be ads for Major League Baseball memorabilia next to your post. If you blog about painting, there might be ads for art supplies.
    Blogger requests access to your AdSense account in order to allow us to create and place ad code on your page through our layouts and template tools. As part of this process, you may notice that Blogger is receiving "0%" of your AdSense earnings - this means that you will receive the same amount for clicks or impressions as you would creating the ad code from your AdSense account. To view any partners that have requested access to your AdSense account, and their associated revenue shares, please log in to your AdSense account, click the "My Account" tab, and choose the "Account Access" sub-tab. If you see a "grant access" link next to blogger.com, you must click this link in order to create ads with Blogger tools.

    Putting AdSense on Your Blog

    This integration between AdSense and Blogger is intended to make it easier for you to get up and running with AdSense on your blog. To place AdSense on your blog quickly and easily, see our help articles here:
    To take full advantage of other AdSense options and settings, you can sign in to the AdSense site and have a look around. That's where you can see how much money your ads are earning and all that good stuff.

    Troubleshooting

    The publisher must be assocaited with the developer account before the developer can invoke operations on the publisher's account.

    The error message above will occur when you try to associate a blog with an existing, yet unlinked AdSense account. To link the AdSense and Blogger accounts, please log in to your AdSense account, click the My Account tab, and choose the Account Access sub-tab. You'll see a grant access link next to blogger.com, you must click this link in order to create ads with Blogger tools. You will then be able to log back into blogger.com and continue setting up AdSense from the Monetize tab.
    See Also: What Is AdSense?

    Putting Google Affiliate Network on Your Blog

    Google Affiliate Network and AdSense have integrated their payment systems to provide you with even more options to monetize your blog. To place Google Affiliate Network links on your blog:
    1. Sign up for a Google Affiliate Network account.
    2. To sign up for advertiser programs, click Advertisers, then click the Join tab.
    3. Check out our Help Center content on generating links for your advertisers.
    4. Once you've chosen which links to post on your blog, copy and paste them into Notepad, Text Edit, or a similar program.
    5. Log into your Blogger account and go to the Layout page.
    6. Select HTML/Javascript under 'Add A Gadget.'
    7. Enter your links' HTML code (found in your Google Affiliate links management center).
    To take advantage of other Google Affiliate Network options and settings, you can sign into the Google Affiliate Network site and have a look around.
    See Also: What is Google Affiliate Network?

    How to put AdSense and Google Affiliate Network in your blog's sidebar

    Note: This article assumes you are using a classic template. For Layouts-enabled blogs, you can simply add a new AdSense page element to your sidebar, or drag an existing element to the desired location.
    If you're new to AdSense and not too familiar with making modifications to your blog's template, you can follow these instructions for placing AdSense code in your blog's sidebar (using the Minima template as an example).
    Assuming you have already signed up and been approved for a Google AdSense account, you should be able to log in here. Once you're signed in, click the AdSense Settings tab near the top of the page. To cut right to the chase, focus on these steps:
    1. Choose Your Ad Layout - To fit ads in your sidebar, it's best to choose one of the following ad layouts.
      Button (125x125)
      Skyscraper (120x600)
      Wide Skyscraper (160 x 600) 
      Vertical Banner (120 x 240)
      Small Rectangle (180x150)
      
    2. Choose a color palette - They are very cleverly named but it's really just a matter of your preference.
    3. Copy your AdSense code - At the bottom of the page, there's a box with code in it. Highlight all of that code and copy it.
    4. Paste the code somewhere - Notepad or Text Edit or something like that is a good place for now.
    5. Go to Blogger.com and sign in - Choose the blog you want to put ads on and click the template tab.
    6. This is less of a step and more of a precaution - Copy your entire Blogger template and save it in Notepad or Text Edit just in case.
    7. Find the place in your template that says this; you might have to scroll down pretty far:
      <!-- Begin #sidebar -->
      <div id="sidebar"><div id="sidebar2">
    8. Paste the AdSense code you saved earlier right after that part.
      <!-- Begin #sidebar -->
      <div id="sidebar"><div id="sidebar2">
      PUT YOUR ADSENSE CODE HERE!
    9. Save your template changes and republish your blog.

    How to put Google Affiliate Network links in your blog's sidebar

    If you're new to Google Affiliate Network and not too familiar with making modifications to your blog's template, you can follow these instructions for placing Google Affiliate Network links in your blog's sidebar (using the Minima template as an example).
    Once you sign up and are approved for a Google Affiliate Network account, you can sign in here to view your account. Once you're signed in, click the Links tab near the top of the page. Select which advertiser's links you want to work with, and then follow these steps:
    1. Choose your links - In the 'Links' section of your profile, select the advertiser whose links you want to use. Click Get Links in the Action drop down menu next to the advertiser's name. Click either the Text Links or the Image Links tab to view your options in each category. To fit ads in your sidebar, it's best to choose one of the following dimensions for an image link:
      Button (125x125) 
      Skyscraper (120x600) 
      Wide Skyscraper (160 x 600) 
      Vertical Banner (120 x 240) 
      Small Rectangle (180x150)
    2. Copy your Affiliate link HTML - Just beneath your desired link, click Get HTML. A box with code in it will appear. Highlight all of that code, then copy and paste it into Notepad, Text Edit, or a similar program.
    3. Sign in to Blogger - Choose the blog you want to put ads on and click the Template tab.
    4. Caution - Copy your entire Blogger template and save it in Notepad or Text Edit just in case.
    5. Find the place in your template that says:
      <!-- Begin #sidebar -->
      <div id="sidebar"><div id="sidebar2">
    6. Paste the Affiliate link HTML you saved earlier right beneath that place in the template:
      <!-- Begin #sidebar -->
      <div id="sidebar"><div id="sidebar2">
      PUT YOUR AFFILIATE LINK HTML HERE!
    7. Save your template changes and republish your blog.

    Blogging from iGoogle and Gmail

    The Blogger Posting gadget makes it easy to post to your blog from the convenience of Gmail or your iGoogle homepage.

    To add the Blogger Posting Gadget to your iGoogle page, simply click this button:
    Add to Google
    Then click the blue "Add to Google" button. Make sure that you're signed in with the same Google account that you use for Blogger. Once you've added the Blogger Posting Gadget you will see the gadget on your iGoogle page:
    To add the Blogger Posting Gadget in Gmail, you'll first have to enable the Add Gadget by URL lab feature from your settings:
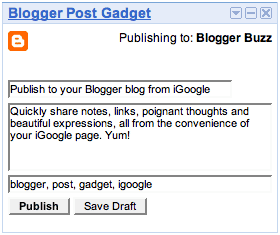
    Once you've enable this Labs feature, then you can add the posting gadget by simpling entering its URL into the Gadget tab in your Settings. Here's the URL:
    http://www.blogger.com/gadgets/post.xml
    In the top right corner of the gadget you will see the title of your blog. If you have more than one blog, there will be a drop-down menu in the corner so you can select the blog you'd like to post to. You can then enter a title and write a post. You also have the option to add labels to your post as well. Once you have finished writing your post, click "Publish" to publish your post or click "Save Draft" to save your post back to Blogger without publishing it.
    Notes:
    • The gadget supports editing the HTML of title and body.
    • If you start writing a post and decide you want to upload images or use other rich text features, just click "Save Draft". The gadget will save your post, then give you a link to directly edit the post in Blogger.
    • The gadget works in Firefox, Chrome, Safari 3, Internet Explorer and on the iPhone.

    Blogger Features

    We created Blogger to give you an easy way to share your thoughts — about current events, what's going on in your life, or anything else you'd care to discuss — with the world. We've developed a host of features to make blogging as simple and effective as possible.
    Getting Started | More Features | Advanced Features

    Getting Started

    New! Customise your design

    The Blogger Template Designer offers many templates, making it simple for you to create a professional-looking blog. In addition, the Template Designer lets you customise your template. Choose from hundreds of background images, tens of flexible layouts and rearrange widgets through a drag and drop interface. Add gadgets such as slideshows, user polls or even AdSense ads. Changing fonts and colours is easy too. And if that’s not enough control, you can even edit your blog’s CSS and HTML.

    Publishing your voice is easy and free

    Creating your blog with Blogger takes just a few easy steps. In a matter of minutes you can start posting text, photos, videos and more to your blog. Post as often as you want; it's free. Take a look at this article on How to get started or watch the How to create a blog with Blogger video.

    Simple-to-use interface

    Follow a few basic steps to start posting to your blog. Our simple-to-use interface lets you change fonts, bold or italicise your text, adjust text colour and alignment and more. As you compose each new blog post, Blogger saves it automatically, without interrupting your typing. There's also an easy-to-use spellcheck feature and a simple way to add labels to your posts. In addition, Blogger includes an HTML editor that lets you fully customise the look and feel of your posts.

    Your free website

    When you create your blog, you can host it for free on Blog*Spot. Just choose an available URL and you're ready to go. If you change your mind and want a different URL later, making the change is easy. Blogger also includes a custom domain option; you can have a domain name, such as example.com and we'll still host your blog there, giving you all of Blogger's great features.

    Add photos and videos to your post

    You can easily add a photo to your blog post by clicking on the image icon in the post editor toolbar. Your photos are then hosted in your free Picasa Web Albums account, where you can order prints and organise photos into albums. Adding a video to your post is just as easy; just click on the film-strip icon on the post editor toolbar to get started. Videos uploaded through Blogger are hosted on Google Video.

    More Features

    New! Earn money

    With Blogger, you can earn money just by posting high quality original content on your favourite topics. Blogger has a dedicated Monetise tab that allows you to easily place AdSense ads on your blog. Also, through Blogger’s Amazon Associates programme, you can search Amazon’s product catalogue and add links to products you recommend that earn you commission when your readers buy these products.

    Develop your community

    Let your readers follow your blog by adding the Followers gadget to your layout. With this gadget, your readers can click the "Follow This Blog" link to add your blog to their Blogger Dashboard and Google Reader account. They also have the option to add their image and profile to your blog to tell the world that they're a fan.

    Feedback from your readers

    It's easy for readers to leave comments on any of your blog posts, giving you useful, timely feedback. They can leave comments right below the post, in a pop-up window or on a separate page. You can also use Reactions to let your readers quickly provide feedback with just one click.

    New post notifications

    Your readers can choose to subscribe to your blog's feeds, so they're notified whenever you publish a new blog post. You can also customise what's shared in your blog's feed and set up your blog to email new posts automatically to specific email addresses or mailing lists.

    One simple ID

    Since you can log in to Blogger with your Google Account — which also gives you access to Google Mail, iGoogle, orkut, etc. — you have one less username and password to remember. Your blog's address can also be used as an OpenID to give you a single digital identity across the web. Since your blog can accept comments from OpenID users in addition to registered Blogger members, it'll be easier for all your readers to leave feedback and participate in your conversations.

    Languages of the world

    Blogger is currently available in 41 languages including English, French, Italian, German, Spanish, Dutch, Portuguese, Chinese, Japanese and Korean. Arabic, Hebrew and Persian speakers can use Blogger with Right-to-Left display and formatting. And transliteration is available for five Indic languages.

    Advanced Features

    New! Pages

    With Blogger’s Pages feature, you can create new pages that are linked from your blog. For example, you can create an “About This Blog” or a “Contact Me” page, in a similar way you write a new blog post, and provide links to those pages as tabs at the top of your blog or in the sidebar.

    Posting on the go

    Blogger has many additional ways for you to post to your blog. You can post to your blog from your mobile phone or through a secret Mail-to-Blogger email address. Or use the Blogger Post Gadget to edit and publish posts directly from your custom iGoogle homepage. With these options, it's easy to post to your blog whenever you want, from wherever you may be.

    Group blogging

    With Blogger, it's easy to create a team blog, allowing multiple bloggers to contribute to a single blog. You select which team members have administrative authority and which are authors only. You can also choose to make your blog private and restrict who can view it. This puts you in full control of your blog.

    Third-party applications

    You can choose among a host of third-party applications that integrate with Blogger to make it even easier for you to blog. Make sure that you take a look at code.blogger.com if you're a developer and want to create your own great app.

    Even more features...

    We're constantly developing new features for Blogger; take a look at Blogger Buzz to stay on top of all the latest additions and changes. If you want to try some of our experimental features, take a look at Blogger in draft. And if you need more information about any of Blogger's features, make sure you visit the Blogger Help site or discussion group. To see what others are posting, take a look at Blogs of Note. We hope you like what we've created.

    How can I make my blog load faster?

    The speed at which your blog loads is critical to attracting more readers to your blog. If your blog takes a long time to load, many readers may leave your blog before they have the chance to read it. Here are a few tips and tricks that will help your blog load faster and attract more users:

    Posts

    Your blog's load time can be affected by the number of posts you display on your main page. You can easily edit the number of posts displayed of the main page from the Settings | Formatting tab. You can then select the number of posts you want to display on the main page. We recommend displaying 10 or fewer posts on the main page.

    Third Party JavaScript and Links

    For optimal blog load speed, we recommend using Google/Blogger widgets, JavaScipt and links. However, if you need to use third party JavaScipt and links, your blog will load much faster if you put all JavaScript at the bottom of your blog. If you have third party JavaScript and links in your sidebar, put them in at the bottom of the sidebar.

    Images and Media

    Learn even more ways Google products work together.
    The more images, videos and other multi-media you have on your blog the longer it will take to load. However, images and other multimedia are important to attracting users to your blog, so it is important to optimize the load speed of your images and media. Here are a few tips to increase the load speed of your media:
    • Decrease the size of your images or use thumbnails that link to the full-size image.
    • If you use third party images, consider uploading them to Picasa Web Albums via the Blogger post editor.
    • If you have a large number of images to display, you can upload all your images (from a vacation or event) to a Picasa Web Album and link to the album in your post or sidebar.

    Other suggestions

    • If you've added any custom CSS to your blog, make sure you put it at the top of the page.
    • The most important content of your blog that catches readers attention should load the quickest. To help you identify which items are taking the longest to load you can use Stopwatch. To use Stopwatch, enter your blog's URL into the text box and click "Start StopWatch". Stopwatch will then open your blog in a frame and will record the time it takes for everything on your blog to load, including images, videos, widgets, etc. Take note of the items that take the longest to load and modify them appropriately using our suggestions.

    11 Backlinks Building Tips And Top 30 Free Backlink Sites For Blogger

    What is Backlinks?

    Backlinks are links Which pointed to your site from another website.

    How long it will take to build quality backlinks?

    Remember that growing backlinks naturally is the key. If you build them too fast, you get penalized so a natural growth of backlinks should take about 5-6 months. After a 5-6 month campaign a you shouldn’t have to focus that heavily on it- since they should be growing on their own. Your campaign should be a multi-pronged approach that includes at least one PRWeb press release, directory submissions (at least 300 with PR 6 or above- traffic-imagegrown slowly over -5-6 months), link bait tools (permanent homepage mashup (web app)/lead capture tool), posts comments on related blogs regularly and an automated ping service that will notify social engines and Google when content is updated for increased crawls. The combination of those tools over a 5-6 month campaign should result in a healthy backlink number of at least 1000 new quality backlinks. You want to grow backlinks conservatively but consistently to get the most out of their SEO value.

    Here are my 11 favorite strategies to build backlinks and how a real estate or mortgage site could leverage them into quality backlinks and traffic.

    1. Directory Submissions:. Directory Submission Marketing is a solid way to begin a Backlink Strategy. Want places where you can find lists of directories? OK, OK, here are a webmasters secrets: The Directory Archive and Best Web Directories (this is the only paid service I recommend. Select the slow manual building method that hits 200 directories). You really only want “Ultra-trusted directory” listings. These “Ultra-trusted directories” typically charge for an editorial review, not a listing (meaning they can legitimately be trusted). Some of these sources I recommend are Google’s Webmaster Guidelines, Dmoz, Yahoo! Directory, MSN bCentral and Business.com. There are also a bunch of real estate related directories out there that I highly recommend adding yourself to. I may compile a list of those soon for ya’ll let me know that you want that list.
    2. Parasitic link sources: You can leverage the trust of older authority sites if they allow user-generated content such as Squidoo and Wikipedia. You can add links to Squidoo and Wikipedia.
    Wikipedia: Do you have a real estate -related site? Do not try to add your homepage link to en.wikipedia.org/wiki/Real_estate or en.wikipedia.org/wiki/Homes. Instead, add the deep link to your “$0 Down Home Loans Explained” page from http://en.wikipedia.org/wiki/0_donwn_home_loans. It’ll have a much better chance of still being there tomorrow.
    Squidoo: Make your lens useful and link out to other authority sites in your niche – this will help to map your site into the neighborhood. Hey check out Teresa Boardman’s Real Estate Squidoo Lens.
    3. News, syndication and PR: Syndication is a wondrous thing. For those of you with blogs, you know the power of RSS feeds, for those of you without one- buy a blog!
    Back to syndication: Syndicate an article at EzineArticles, GoArticles, iSnare etc. Good article sites like these actually rank highly and send highly qualified traffic. Another great resource for syndicating your real estate related article is RealEstateVoices. Same goes for Press Releases- use an online PR firm like PRWeb or PRLeap and track who picks up your news so you can offer them exclusives in the future.
    4. Social Bookmarking: Now, Social Bookmarking is a fabulous tool. “Me love you long time!” Our blogs have this super cool tool built-in which really helps drive traffic and create valuable links. Basically, people can tag your article as helpful and submit it to Yahoo!, Del.icio.us, Technorati, Digg etc. If people find the sites you tag to be interesting, emotionally engaging, or timely they may follow the trail back to your site.
    5. Local Links: Your business is local, so market locally even online. You can use services like Local Launch and Reach Local. You can also join the local Chamber of Commerce, get linked on state and governmental resource sites, libraries and other local business sites. My only concern here is that the quality of the backlink might not be all that great. You do want to look at the Page Rank of the site that is linking to you as Google does care that your back links are trusted, quality sources. That being said, I still think it is a good idea.
    6. Post on forums, groups and blogs. Be the expert, answer questions on Yahoo! Answers and Google Groups and provide relevant resource links (including one to your own site). Commenting on blogs with relevant interesting posts is another great way to drive traffic and backlinks back to your site. Be aware that many blogs have placed “no-follow” tags on comments so you can lose some SEO value but you will pick up traffic that way.
    7. Review other sites and products. Review products on Amazon.com. You can draw in direct customer enquiries and secondary links by doing this. It also recommends creating product lists on Amazon.com that review top products and also mention your background (LINK!). So, as a real estate professional, review real estate, lending or investing books. Another great strategy is to review related sites on Alexa to draw in related traffic streams.
    8. Blogs. Oh yeah, baby. We love blogs and what they can do for you. You must too, since you’re reading mine right now! Blogs drive traffic. When you blog about things people care about and you execute it all well, you will drive both back links and traffic. To help drive some initial traffic be sure to comment on other blogs and forums. You can also get involved with Technorati! Their tag pages rank well in Yahoo! and MSN, and even in Google. Even if your blog is fairly new you can have your posts featured on the Technorati tag pages by tagging your posts with relevantly. Also make sure to list your blog in a few of the best blog directories.
    9. Web 2.0 your site. This is another one we hold near and dear to our geeky little hearts. Have your developer design a few AJAX, Lightbox, or other web2.0 app that complies with www.w3c.org standards, use social bookmarking, redesign your site with a Web 2.0 look (mirrored effect, glossy menus, frosted glass images, etc.), use CSS properly. Once you do that you can submit your site to places like www.cssbeauty.com, www.cssremix.com, www.cssvault.com and other more technical sites that look for AJAX and cool super-geek technologies. SEOmoz also runs a web 2.0 contest annually you can submit to. For example, one of my favorite real estate blogs, Sellsius received an honorable mention last year. So, it makes sense to pay a developer to revamp your site with web 2.0 design or add a web 2.0 application. The reward in quality backlinks and traffic will far outweigh the cost.
    10. Hold contests, enter contests. If you have some decent traffic, hold contests on your site. We’ve run some contests for Realtors and Lenders that have driven some great traffic. If you have the skill set, enter contests. You can enter web design, web 2.0 and other real estate or web design related contests. The best thing about contests, is that if you win- you can garner some grand titles that you can use to market yourself with on your site in addition to all those useful links. I mean, what Realtor wouldn’t like to be called “the Grand Pooh-ba of Northern Florida Real Estate Blogging?”
    11. Blog Carnivals. Get involved with the hottest thing in blogging today, Blog Carnivals. According to wikipedia, a blog carnival is a blog article that contains links to other articles covering a specific topic. Blog Carnivals are often referred to as another form of viral marketing because it provides participants another way to increase traffic and gain links to their blog. Basically, a blog carnival is a type of aggregator where one “hot” industry blog displays the best of posts across the Internet on a particular topic. It’s a great tool for introducing a blog to a community and driving substantial traffic to it. Just check out Carnival of Real Estate.

    Top 30 Free Backlinks Buiding sites For You

    Resource: “Do Follow” Blog Directory
    Backlink Type URL PageRank
    .EDU http://sloan.ucr.edu/ 6
    .EDU http://recenter.tamu.edu/links/ 6
    Directory http://dir.yahoo.com/ 9
    Directory http://www.dmoz.org 9
    Directory http://www.stpt.com/ 8
    Directory http://yahooligans.yahoo.com/ 8
    Directory http://www.open-site.org 8
    Directory http://www.blogwise.com/ 8
    Directory http://www.bloggernity.com 7
    Directory http://www.blogrankings.com 7
    RSS Submission http://www.rsshugger.com 3
    RSS Submission http://www.technorati.com 8
    RSS Submission http://www.rss-spider.com/ 4
    RSS Submission http://www.readablog.com/ 4
    RSS Submission http://www.blogarama.com/ 7
    RSS Submission http://www.globeofblogs.com/ 7
    RSS Submission http://www.blogsearchengine.com/ 4
    RSS Submission http://www.weblogalot.com/ 4
    RSS Submission http://www.strategicboard.com/ 4
    RSS Submission http://www.mybloglog.com 7
    RSS Submission http://pingomatic.com/ 7
    RSS Submission http://www.feedsfarm.com/ 5
    RSS Submission http://www.rssfeeds.com/ 5
    RSS Submission http://feeds2read.net/ 5
    RSS Submission http://www.plazoo.com/ 6
    RSS Submission http://www.jordomedia.com/ 6
    RSS Submission http://www.rssbuffet.com/ 3
    RSS Submission http://www.feedburner.com 8
    RSS Submission http://www.feeddirectory.us/directory 8
    Blog http://www.blogmaverick.com/ 6

    How App-Like Design Can Turn Your Site Visitors Into Customers

    We’ve all heard the expression “The customer is always right,” but what about making the customer experience on your website so thoughtful that they don’t ever feel unappreciated, forgotten or neglected?
    According to AnnoyingDesign.org, the average time a user spends on a site is only 56 seconds. You have just 56 seconds to turn your site visitors into customers. Is it possible? Certainly, and app design shows us the way.
    What’s the cornerstone of app-influenced design? Action-oriented design components, which create immediate functionality. It’s the purposeful construction of obvious pathways that creates user friendly navigation. Focusing on visuals, placement and interaction can transform your site and your business.

    Visuals: Symbols and Icons and Pictograms, Oh My!


    Take a look at the two major printing sites shown here. The first site’s homepage is heavy in text and provides only its logo as imagery. The company’s product selection is displayed in a simple column on the left-hand side of the page, providing some sense of organization, but is it user friendly? Unfortunately, it’s not. The content-dense site may be highly visible to search engines, but it’s time-consuming to navigate, which is likely costing them business.


    The second company’s site follows the same structure — listing its popular products in the left navigation — however it outdoes the first company by having a much more accommodating design. The site offers visual icons (very similar to apps) for each of their services. The main navigation consists of miniature color-coded pictograms (images used in place of concepts, objects and actions), which also provides app-like usability.


    print place image
    Apps are all about pleasing the user by making navigation easier so people can achieve results faster. It’s more engaging and effective for a user to view primary navigation and action paths with supporting pictograms, as opposed to those that only contain text. For instance, the pictogram of a shopping cart on a navigation menu translates to “view order,” which resonates with users instantly. Not only are pictograms instantaneous, they’re also usually independent from language, allowing a global audience to confidently carry out tasks.
    Below, Domino’s Pizza illustrates exactly this notion of making a task more enjoyable and better yet, faster (even speed readers combine symbols with text). Dominos.com requires specific user information from individuals as they complete online orders. The pizza company focused on the pragmatics (relations between the meaning of symbols and their users) as they made the often tedious task of filling out location information more visually appealing and less time consuming for users.


    dominos image


    Placement: Laying Down the Obvious Pathways


    “Location, location, location” is key real estate, and should also be the golden rule of your homepage. As soon as your site appears on a user’s screen, they’re ready to go… but where?
    Make all key actions on your site clearly accessible from the homepage. Unlike an app, your website is larger and has more room to fill. The main navigation of your homepage should be an ultimate go-to zone, so visitors don’t have to scroll down to find what they are looking for. The American Red Cross illustrates this tactic below. In the upper right-hand side of AmericanRedCross.org, users are provided with a search field [Figure 1], donation button [Figure 2], location finder [Figure 3], and various primary navigation items directing them to popular motives (in this case: “Give Blood,” “Volunteers,” “Take Classes” and more) for visiting the site.


    red cross image


    Interaction: Give the User a Bit of Control


    Apps give users a feel of piloting — whether it is customization or creative routes of gathering desired info. Biggby Coffee offers customization by letting users choose the background skin of Biggby.com. Look to Adidas.com as an example of letting users run with their curiosity while still providing fast results.
    Adidas’s homepage is filled with imagery, which visitors can scroll over to view multiple options [Figures 1 and 2], like voting on favorite sports players, connecting to Adidas’s social channels and shopping Adidas sportswear. And for visitors who have a precise agenda and aren’t in the mood to gallivant on Adidas.com, the company has wisely created a main navigation with pictograms for users with straightforward missions.


    adidas image


    Looking Ahead


    Good websites in 2011 will be all about task-accommodating design, just like apps. Get ready to see revamped websites that are more visual, easier to utilize and more accessible. Here’s to a happy and user-centric year in design.

    30+ WordPress 2-Column Themes

    Last time we looked at 3-column themes, and while they allow you to add a lot of sidebar accessories, some people prefer to keep it clean and simple. For those people, we offer up a list of 30+ 2-column themes for you to choose from.
    One thing to keep in mind when choosing a theme is Fixed Width vs. Variable Width. Fixed Width themes are just that: a fixed set of dimensions and will show up the same in all browsers. Variable Width themes change to the dimension of the display they are being seen on; while it looks good to fill the entire screen, make sure to check extreme display sizes to see if the theme “breaks” at certain sizes. All of those shown below are fixed width themes.
    This article is part of the WordPress Tips series.
    Left Sidebar
      DarkT
    DarkT – Slick black design, extremely legible, very modern looking, fixed width and widget ready.
      Green Bug
    Green Bug – Very pleasant looking fixed width and widget ready theme, great for a nature blog.
      HijauSegar
    HijauSegar – Very open with easily edited headers. Fixed width.
      Integral
    Integral – Very uncluttered design, would make a great theme for a company blog, fixed width and widget ready. Fixed width.
      Melod Art
    Melod Art – Unique coloring, would make a great family blog. Fixed width and ready for widgets.
      Notes
    Notes – Why not make your personal website look like an actual personal journal?
      Rainbow Feather
    Rainbow Feather – Fluid width theme, perfect for a writer or someone aspiring to be one.
      RedHorizon
    RedHorizon – Clean and professional, stylish. Fixed width and widget ready.
      Riaz
    Riaz – Very professional and classy looking, could be purposed for many needs. Fixed width and widget ready.
      rounded-transparent
    Rounded Transparent – Very clean, easy to navigate, stylish without being overly so, fixed width, widget ready.
      Simply Blue
    Simply Blue – Nice rounded corners, modern looking, fixed width and widget ready.
      Simplicity 2.0
    Simplicity 2.0 – Just as the name applies, very simple, but visually appealing. Would make a great personal blog, or possibly fashion related. Fixed width, widget ready.
      Skeletons In My Closet
    Skeletons In My Closet – Very easy to read, fixed width, great for a personal or music blog.
      Solid
    Solid – Very stylish, clean reading, fixed width, widget ready.
      ImJTk
    Was: ImJTk – Nice mixture of colors, very smooth and free flowing, fixed width, widget ready.
    Right Sidebar
      Blending Curves
    Blending Curves – Pink is a difficult color to pull off in a lot of themes, but this one does it well with blending in a “torn out journal pages” feel. Fixed width and widget ready.
      Blogger’s Cafe
    Blogger’s Cafe – Very simple, great for sites about blogging, coffee shops, or just plain old coffee lovers. Fixed width.
      Blue-Ridge
    Blue-Ridge – Muted colors so as not to distract, great for a personal blog, fixed width, widget ready.
      Boxy Mint
    Boxy Mint – Great personal page or company blog, versatile, modern look. Fixed width and widget ready.
      Elegant Purple
    Elegant Purple – Great personal blog with an all purple look. Fixed width and widget ready.
      Green Love
    Green Love – Great personal or travel theme, fixed width and widget ready.
      Green Pro 2.0
    Green Pro 2.0 – Excellent use of green, versatile look that can be used for many different sites. Fixed width and widget ready.
      Leaf On Edge
    Leaf On Edge – Very versatile theme that could be used for blogs on any number of subjects, fixed width.
      Lemon & Lime
    Lemon & Lime – Pleasing colors, logo placeholder, fixed width and widget ready.
      Melmac
    Melmac – About as modern as you can get, lots of potential. Fixed width, widget ready.
      NightLight Idea
    NightLight Idea – Nice black theme with lite animation in the header. Fixed width and widget ready.
      Otek
    Otek – Orange colored, but not enough to be distracting, clean navigation, Fixed width and widget ready.
      Persian Minyx
    Persian Minyx – Fixed width and widget ready, unique way of marking the width.
      Pgreen
    Pgreen – Very readable, versatile look for a fixed width theme that is widget ready.
      Raised
    Raised – Blue everywhere, but still readable. Child page navigation is a little sloppy, but passable. Fixed width.
      RedPlanet
    RedPlanet – Great for a science or technical blog, very customizable, fixed width, widget ready.
      Silver Light
    Silver Light – Another good professional person’s theme, fixed width, widget ready.
      sybmimdx-remix-ghost
    SybmimDX Remix: Ghost – Very simple, would make a great professional blog, fixed width.

    PR5 Above Social Bookmark Sites With Backlinks

    We listed 100 social bookmarking sites here,  41 of them are Pr5 or above.
    Social Networks can be a useful source of good quality backlinks.
    If you are planning to go on a massive social bookmarking spree, you may find this list useful.
    If any of the information is wrong, or a site is missing, please let me know.
    1. Slashdot – PR9 – 188,000 links
    2. Digg – PR8 – 3,470,000 links
    3. del.icio.us – PR8 – 1,540,000 links
    4. Reddit – PR8 – 1,040,000 links
    5. Technorati – PR8 – 760,000 links
    6. Stumbleupon – PR8 – 725,000 links
    7. Blinklist – PR7 – 1,620,000 links
    8. Furl – PR7 – 1,210,000 links
    social-networking-marketing9. Propeller – PR7 – 322,000 links
    10. Rojo – PR7 – 6060 links
    11. de.lirio.us cut the web down to size – PR7 – 3770 links
    12. Folkd – PR7 – 410 links
    13. Netvouz – PR6 – 912,000
    14. Mister-Wong – PR6 – 898,000 links
    15. Simpy – PR6 – 867,000 links
    16. Bibsonomy – PR6 – 469,000 links
    17. Kinja – PR6 – 438,000 links
    18. Backflip – PR6 – 227,000 links
    19. Clipmarks – PR6 – 121,000 links
    20. Rawsugar – PR6 – 50,300 links
    21. Searchles – PR6 – 32,000 links
    22. Searchallinone – PR6 – 18,800 links
    23. Tailrank – PR6 – 10,900 links
    24. Linkagogo – PR6 – 6790 links
    25. Web2List – PR6 – 4780 links
    26. Spurl – PR6 – 38 links
    27. Faves – PR5 – 1,280,000 links
    28. Megite – PR5 – 753,000 links
    29. Clipclip – PR5 – 323,000 links
    30. StartAid – PR5 – 637,000
    31. Linkroll – PR5 – 147,000 links
    32. Sk*rt – PR5 – 104,000 links
    33. Listible – PR5 – 60,400 links
    34. Feedmarker – PR5 – 58,800 links
    35. Markaboo – PR5 – 48,400 links
    36. Bringr – PR5 – 16,500 links
    37. Gabbr – PR5 – 5000 links
    38. Mybookmarks – PR5 – 916 links
    39. Buddymarks – PR5 – 907 links
    40. Tallstreet – PR5 – 408 links
    41. Mylinkvault – PR5 – 71 links
    Social bookmark sites with PR4 or Below

    42. Ma.gnolia – PR4 – 818,000 links
    43. Web2Announcer – PR4 – 305,000 links
    44. Diigo – PR4 – 276,000 links
    45. Plugim – PR4 – 120,000 links
    46. Lifelogger – PR4 – 86,700 links
    47. Dropjack – PR4 – 65,000 links
    48. Indiasphere.Net – PR4 – 45,900 links
    49. Otavo – PR4 – 35,000 links
    50. Butterflyproject.nl – PR4 – 34,500 links
    51. Lookmarks – PR4 – 32,700 links
    52. Myvmarks – PR4 – 28,200 links
    53. Blurpalicious – PR4 – 25,300 links
    54. Cloudytags – PR4 – 24,100 links
    55. Mysitevote – PR4 – 20,000 links
    56. A1-Webmarks – PR4 – 15,200 links
    57. Philoi – PR4 – 12,400 links
    58. Oyax – PR4 – 12,000 links
    59. Gravee – PR4 – 9940 links
    60. Votelists – PR4 – 6150 links
    61. Gd-Sites – PR4 – 5840 links
    62. Contentpop – PR4 – 5490 links
    63. Gaddiposh – PR4 – 3130 links
    64. Urlex.Info – PR4 – 654 links
    65. Connectedy – PR4 – 636 links
    66. Connectedy – PR4 – 568 links
    67. Zurpy – PR4 – 198 links
    68. Zurpy – PR4 – 189 links
    69. Unalog – PR4 – 162 links
    70. Bookmarktracker – PR4 – 107 links
    71. Bookmarktracker – PR4 – 87 links
    72. Marktd – PR3 – 130,000 links
    73. Getboo – PR3 – 96,500 links
    74. Listerlister – PR3 – 19,100 links
    75. Bookmarkplace – PR3 – 15,100 links
    76. Jigg.In – PR3 – 9220 links
    77. Stirrdup – PR3 – 9220 links
    78. Chaamp – PR3 – 7770 links
    79. Ez4U – PR3 – 6520 links
    80. Socialogs – PR3 – 5200 links
    81. Business-Planet – PR3 – 4740 links
    82. Articlesnetwork – PR3 – 3670 links
    83. Wirefan – PR3 – 3030 links
    84. Fritterware – PR3 – 2970 links
    85. Sitesays – PR3 – 1560 links
    86. Bookmark4You – PR3 – 948 links
    87. Crowdfound – PR3 – 782 links
    88. Authorcontent – PR3 – 513 links
    89. Info4It – PR2 – 91,100 links
    90. Palbe – PR2 – 9300 links
    91. Dealoid – PR2 – 9270 links
    92. Barksbookmarks – PR2 – 7370 links
    93. Articlesarchieve – PR2 – 5350 links
    94. Article-Publishers – PR2 – 4380 links
    95. Latestramblings – PR2 – 3180 links
    96. Xlmark – PR2 – 2120 links
    97. Ebizgo.Info – PR2 – 1150 links
    98. Actualtopics – PR2 – 749 links
    99. Projecthear – PR1 – 19,600 links
    100. Wordsjournal – PR1 – 14,100 links

    AWESOME SUBMITTER – 500+ free backlinks

    There are tons of small domain appraisal services, domain data checkers. Plenty of them keep database of domains/websites results to look “huge” to search engines and have gazillions keywords and keyword combinations.
    Plenty of this appraisal, data checkers have backlink to your domain in result page.
    So what I’m bringing is great submitter. it adds over 500 backlinks.
    Most of them are nofollow but some are dofollow (google doesn’t take such difference in these types lately).
    Also you might get some small traffic.
    Whole process is quite slow, it takes about 15 minutes. But you can make submission in another TAB of your browser and continue working.
    In few days, you’ll have hundreds of new links indexed.
    This might also help new websites to get indexed fast.
    Free of charge, full of joy

    This link is to old version that works fine:
    http://freshsnap.com/__submit/